
Learn about design basics, material selection, and other considerations for paved landscaped areas
Patios anchor the outdoor landscape and provide a firm, level surface for gathering, dining, relaxing and enjoying outdoor space. The ideal patio for you will blend in with the style of your home and the look of your landscape. It also has a special charm that you, your family and guests can all enjoy.
Here’s what you need to know about adding a patio to your yard, including size and installation location, the pros and cons of different pavers, what to hire, how long the project will take, and more.

Who to hire
For most homeowners, hiring an experienced landscaping contractor is the best option. This is especially true if your patio project is large, complex, or requires significant prep work. If you want something more elaborate, it may be a good idea to consult a landscaper or designer (Add Support Links). You will also need a professional to install gas or water pipes and electrical wiring.
Herringbone
Landscaping professionals (Add Support Links) can handle the groundwork involved in obtaining the necessary permits, preparing the site, inspecting power lines, and performing the actual installation. Before choosing a professional for your patio project (Add Support Links), make sure he or she has experience building the type of patio you want. As with any project, check reviews on places like (Add Company Name), ask for references, and see examples of their work.
Installing a dry patio on sand using loose materials, pavers, bricks or stones can be a project that a professional can do themselves. This is especially true if the proposed patio is small and has a simple design. Small concrete paved Patios are also an option for DIYers. Before you begin, assess your skill level and the preparation work needed.
Patio design considerations
Where are you going?
Deciding where to place your patio should be your starting point. Most patios are located to create a transition space between the house and the backyard. Often this location is right next to the kitchen, making it ideal for outdoor activities. A patio adjacent to the living room or family room features generously sized doors between spaces, allowing for an easy transition between indoor and outdoor living spaces.
Not all patios need to be located right next to the house, especially those designed as secondary features within the landscape. Take advantage of the view at one edge of your yard, add a hard surface to a pool or spa area, define a play area, or create a quiet spot in the side yard with a patio
Patios don’t have to be limited to your backyard or side yard. Adding a patio to your front yard creates a space to enjoy and connect with your neighbors. Size. It is wise to think ahead about how you will use your patio to ensure it is large enough to accommodate your needs.
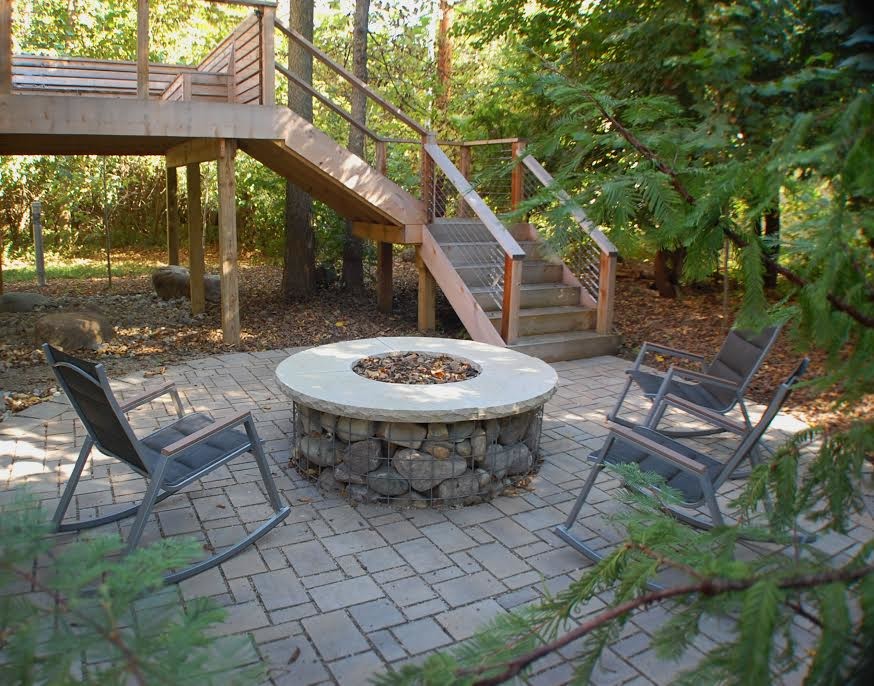
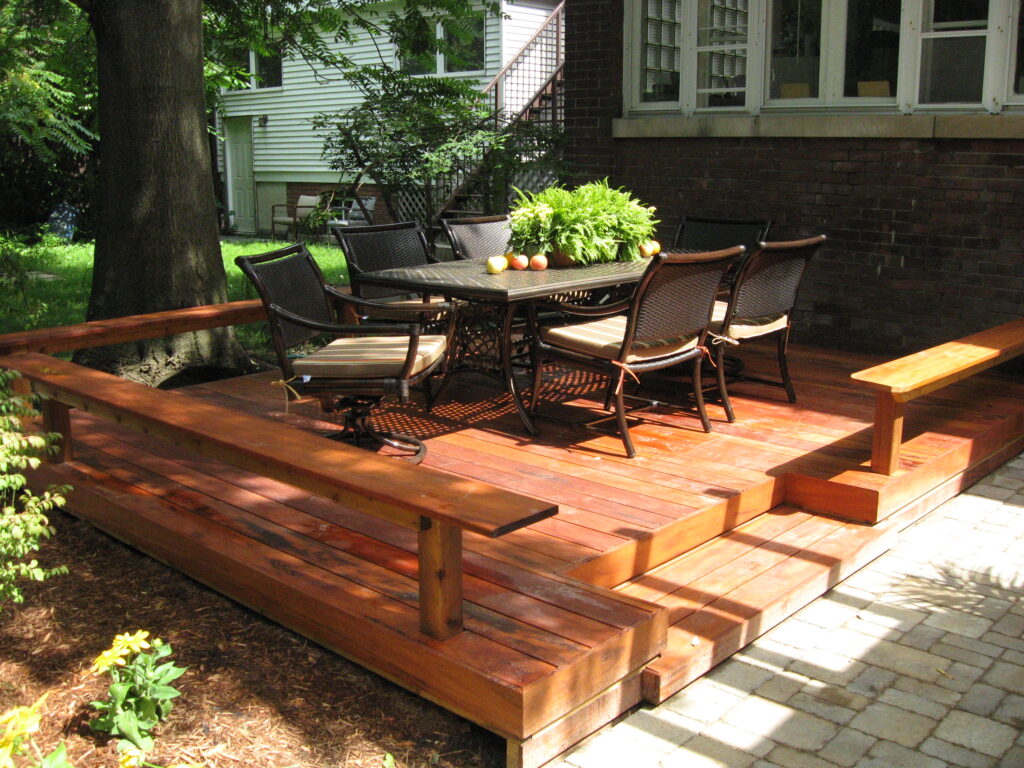
If you plan to use your patio for dining or entertaining, make sure it’s large enough for you to move around the table, pull out chairs, or relax in front of the water or fire. Before building, also decide whether you want to incorporate an outdoor kitchen area, fire pit, spa, fountain or lighting. These features require additional preparation work.
Key measurements for the perfect patio design Shape.
A simple square or rectangular patio can be used for a variety of purposes, from creating a quiet place in your yard for someone to relax to having a full-fledged entertaining space.
For a more sophisticated feel, consider adding curved corners, creating a completely circular space, or pouring large concrete slabs with a small gap in the center for a modern feel. Placing a patio next to your house increases usable space. Style.
The material you choose for your patio surface will determine its look and feel. Concrete is suitable for a variety of landscaping styles. Brick, stone and tile work well in both traditional and contemporary designs. All of these materials, along with loose pavers, can be used in formal or more casual spaces. You can also customize your patio design by adding integrated design features such as decorative accents, mixed materials, plant cutouts, or other garden features.
Patio material options
Although the final look you want for your patio will be a deciding factor, each material has its pros and cons. It is advisable to consider the durability and longevity of the material and ease of maintenance.
Cast-in-place concrete. Concrete is at the top of many people’s lists when it comes to patio materials. It’s versatile, budget-friendly, durable, and low-maintenance. It can be manufactured to imitate brick or stone, is easier to install and is less expensive.
For cast-in-place concrete, you can choose between a continuous surface or a series of large or small concrete pads. The finished shape of a concrete patio can be square, rectangular, round, curved, or freeform. Concrete is a stable surface, so there is no need to add borders to maintain its shape.
Finishing options are nearly endless, from smooth to stamped, brushed, scored, and pebbled. Concrete can also be stained or colored, giving you a variety of color choices. Concrete can also be combined with tile or wood inlay.
Cast-in-place concrete creates a solid, impermeable surface. To handle runoff, drainage systems must be considered and designed. If freeze-thaw cycles occur in your area, this must be taken into account and designed for.
Concrete patios should last for decades, but they require basic maintenance, including regular cleaning and rinsing with water, cleaning up spills that may stain the surface and fixing inevitable cracks. If you apply a sealer, it will need to be renewed every few years.
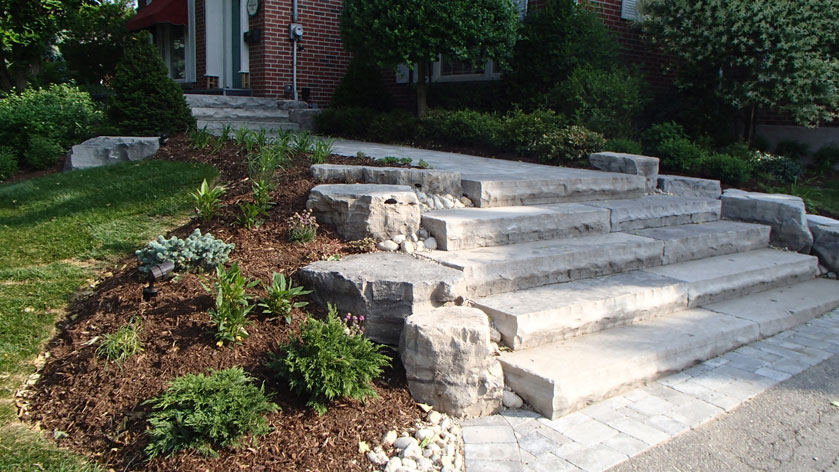
Concrete pavers. Concrete pavers feel like they bridge the gap between a concrete slab and brick or stone pavers. It lasts as long as a poured concrete surface and can mimic the look of brick, stone or cobblestone. Concrete pavers come in many shapes and sizes and can be installed in a variety of patterns to create the look you want.
Concrete pavers have a higher initial cost than concrete slabs, but they last longer, are less likely to crack due to bad weather, and are easier to repair. You can also find permeable pavers. These are designed to allow moisture to escape through them and into the ground below. Some pavers also have cutouts designed to add low-lying ground cover.
Loose or one-piece concrete pavers can more easily mimic other materials, but require the addition of edging or mortar in place. Grouting or adding sand between pavers can also help stabilize the pavers.
Interlocking pavers do not have as many natural shapes or design options as loose pavers, but because they are interconnected, they do not require edging, mortar, or sand to hold them together. Multiple joints also mean that small cracks that form are less noticeable and weeding between pavers is minimized compared to that seen with wider spaced pavers.
Concrete-paved patios require the same maintenance as concrete slabs, requiring regular cleaning, rinsing and removal of spills. If pavers shift, crack, or are otherwise damaged, they can be simply removed and replaced without affecting adjacent pavers. Remove weeds growing between pavers.
Guide: Advantages and disadvantages of precast concrete pavements (Add Support Links) Brick. Whether you’re looking for a classic old-fashioned feel or a modern vibe, consider adding a brick patio. This centuries-old material can define formal spaces, create a casual atmosphere, and set the tone for a modern landscape, depending on the color and layout pattern you choose.
Brick is durable, weather-resistant, and fade-resistant, but color options and shapes are more limited than concrete pavers or landscape stone. It can be cut to fit tight spaces, and if a single brick is damaged it can be removed and replaced. Brick patios provide more traction than stone patios. When choosing a type of brick, make sure it can withstand weather and wear.
Bricks can be laid on a sand foundation mixed with gravel, on a sand foundation on compacted gravel, or on a concrete foundation with mortar. The first option creates a more permeable installation. Once the bricks are in place, the joints can be filled with sand to create a more breathable patio or mortar.
Regular cleaning and washing will keep your brick patio looking good. Remove stains as quickly as possible and remove any weeds growing between the bricks. Moss may look attractive, but it can make bricks slippery. Especially in areas where a lot of people gather, areas with a lot of moss should be cleaned.
Regular power washing will keep your bricks looking new. Avoid sandblasting or using hydrochloric acid as these will damage the brick surface. Sealing your bricks will help keep them bright. Sealants should be replaced every few years.
Guide: Advantages and disadvantages of brick paving (Add Support Links)
Natural stone. Patios built from natural stone add permanence to the landscape. Like brick, stone has been used as a patio surface for centuries. Cut stones give a more formal feel, while irregular slabs give a casual and natural feel
Although one of the most expensive options, stone patios are extremely durable and long-lasting. And just like with bricks, you can also replace individual stones that are broken or chipped. Choose from a variety of stone options, from flagstone, bluestone, limestone, and sandstone to marble and granite, to create unexpected looks. For the most natural look and better price, choose local stone. Another option is natural or artificial gravel. This is attractive, but not always reliable. Works best in small, lightly used areas.
The stone is difficult to work with because it is heavy and breaks easily. It can also retain heat. Although sandstone is cooler than most other stones, it is more porous and more susceptible to water damage. Bluestone requires a sealer, but most other stones benefit from sealing to prevent staining and preserve the surface. To highlight the beauty of your chosen stone, choose a penetrating sealer with a matte finish.
The stones can be placed on a permeable substrate consisting of compacted stone and building sand. The space between the joints can be filled with sand, gravel, or even plants so that water can drain through the joints. Stone can also be installed using mortar over a concrete floor. Basic maintenance includes regularly sweeping and rinsing surfaces as needed. Clean up spills as quickly as possible to avoid stains. Regular power washing will add shine. Remove excess standing water to prevent discoloration. Individual stones placed on sand and gravel may also need to be leveled periodically.
If there are any unwanted plants between the stones, remove them periodically. If you apply sealer, renew it annually. Stone surfaces may last a long time, but joints may become damaged. Check it occasionally and reconnect or reinstall it every few years.
Tile. Patios made of glazed terracotta or clay tiles or unglazed ceramic tiles have been used for centuries in warm winter climates. Today, new processes allow ceramic tile to be installed even in cold climates. These tiles can be cheaper than other materials.
Terracotta tiles, especially the popular Saltillo tiles, are known for their warm, earthy colors and natural variations. It fits perfectly into a rustic setting or Southwestern or Spanish style home.
Terracotta tiles are sturdy, but their porous surface makes them prone to stains and can be easily damaged. Keep it free of dust or foreign substances, and if any stains or stains are found, wipe them clean. Clay tiles, even those designed for outdoor use, can be slippery when wet. It is generally recommended to seal reseal every two years your tiles to prevent them from discoloring or staining. The grout may need to be replaced.
Ceramic outdoor tiles come in a variety of colors and finishes and are stain resistant. Choose unglazed tiles that are rated for outdoor use. It can be left unsealed, but a clear seal can provide additional protection.
Keep your outdoor ceramic tiles clean by regularly mixing a mixture of water and dishwashing detergent, spreading it with a broom and rinsing it. You can also use a power washer. Check annually to see if it’s time to reseal your tiles and renew and reseal your grout lines.
Loose material. Gravel, crushed stone, and decomposed granite (DG) have the advantages of being easy to install, inexpensive, and highly breathable. Although easy to install, patios made from loose materials are not as supportive as other materials, and the materials can easily spread and track through the home. Crushed gravel can be rough even on bare feet.
Even if you use landscaping fabric, you will still need to remove weeds regularly. Gravel can shift easily, so you may need to add more gravel periodically. This is especially true if there are no edges. Gravel surfaces are not as stable as other patio surfaces, so they may not be a stable surface for people with furniture, wheels or mobility issues. Placing gravel on top of a solid base may help.
Other considerations when adding a patio
Permits and codes. Check with your local building department for permit and code requirements before beginning your patio project. Codes and requirements vary widely, even for small patio projects, and additional requirements may be added for more extensive projects. If you belong to a homeowner’s association, check to see if there are any guidelines or restrictions you should be aware of.
When should I do this project? As with all outdoor projects, the best time to build is when the weather is nice, typically spring through fall, when the climate is expected to be mild to warm and dry. You will want to avoid the extreme heat of summer, and cold winter conditions generally do not allow for outdoor construction
How long will it take?
For most patio projects, installing the finished surface material may be the easiest and fastest task. Time is needed to prepare the site, including allowing the concrete to fully harden. If you need a permit or plan to get one, expect it to take longer.
A small patio built from loose materials, bricks or stones can be completed in a day or two. According to experts of RDKHardscapng in buffalo NY USA, it is expected to wake up to a week to create the concrete slab
How you use different materials will depend on the project and the size of your crew, according to experts of RDKHardscapng in Buffalo NY USA. He suggests taking at least a week or two, preferably several weeks.


Purchasing medications online can be far simpler than shopping in person.
You don’t have to wait in line or think about limited availability.
E-pharmacies give you the option to buy your medications without leaving your house.
Numerous platforms offer better prices unlike traditional drugstores.
https://tqfp.org/forum/viewtopic.php?f=19&t=2942
Additionally, you can compare various options quickly.
Reliable shipping means you get what you need fast.
What do you think about ordering from e-pharmacies?
Фанаты слотов могут легко получить доступ к актуальное обходную ссылку казино Чемпион чтобы без проблем запустить любимыми слотами.
В казино доступны разнообразные игровые автоматы, от ретро-автоматов до современных, и самые свежие игры от ведущих производителей.
Если официальный сайт временно заблокирован, рабочее зеркало Champion позволит обойти ограничения и наслаждаться любимыми слотами.
казино чемпион зеркало
Все функции остаются доступными, включая регистрацию, финансовые операции, и, конечно, бонусную систему.
Заходите через актуальную зеркало, и не терять доступ к казино Чемпион!
BlackSprut – платформа с особыми возможностями
Платформа BlackSprut удостаивается внимание многих пользователей. В чем его особенности?
Эта площадка предлагает разнообразные опции для аудитории. Оформление платформы отличается функциональностью, что позволяет ей быть доступной без сложного обучения.
Необходимо помнить, что данная система обладает уникальными характеристиками, которые отличают его на рынке.
Обсуждая BlackSprut, нельзя не упомянуть, что различные сообщества оценивают его по-разному. Некоторые выделяют его удобство, а некоторые оценивают его более критично.
В целом, эта платформа продолжает быть темой дискуссий и удерживает заинтересованность разных пользователей.
Свежий домен БлэкСпрут – здесь можно найти
Хотите узнать актуальное ссылку на BlackSprut? Мы поможем.
https://bs2best
Сайт может меняться, поэтому важно иметь актуальный домен.
Свежий доступ легко узнать у нас.
Проверьте рабочую версию сайта прямо сейчас!
На этом сайте представлены популярные слот-автоматы.
Мы предлагаем ассортимент игр от популярных брендов.
Любой автомат отличается уникальной графикой, призовыми раундами и щедрыми выплатами.
http://www.machtoo.com/__media__/js/netsoltrademark.php?d=casinoreg.net
Пользователи могут играть в демо-режиме или играть на деньги.
Интерфейс интуитивно понятны, что делает поиск игр быстрым.
Если вас интересуют слоты, этот сайт — отличный выбор.
Начинайте играть уже сегодня — тысячи выигрышей ждут вас!
Skin health involves protection, hygiene, and awareness of common conditions. Understanding issues like acne, eczema, psoriasis, and skin cancer is important. Learning about sun protection is crucial for preventing damage and cancer. Familiarity with medical preparations used in dermatology is relevant. Knowing about topical creams, ointments, or oral medications requires info. Finding trustworthy advice on skincare and condition management is helpful. The iMedix podcast addresses common health concerns, including skin conditions. As one of iMedix’s popular podcasts, it covers relatable topics. Follow my health podcast suggestion: iMedix for skin health tips. Visit iMedix.com for dermatological information.
Self-harm leading to death is a serious phenomenon that impacts many families across the world.
It is often linked to emotional pain, such as bipolar disorder, hopelessness, or substance abuse.
People who struggle with suicide may feel isolated and believe there’s no hope left.
how to commit suicide without pain
It is important to talk openly about this topic and offer a helping hand.
Early support can reduce the risk, and talking to someone is a crucial first step.
If you or someone you know is thinking about suicide, don’t hesitate to get support.
You are not forgotten, and there’s always hope.
Здесь вам открывается шанс играть в большим выбором слотов.
Эти слоты славятся яркой графикой и захватывающим игровым процессом.
Каждый слот предлагает уникальные бонусные раунды, повышающие вероятность победы.
1xbet казино зеркало
Игра в слоты подходит игроков всех уровней.
Есть возможность воспользоваться демо-режимом, после чего начать играть на реальные деньги.
Попробуйте свои силы и окунитесь в захватывающий мир слотов.
Our platform offers plenty of slot games, ideal for both beginners and experienced users.
Right here, you can explore traditional machines, new generation slots, and jackpot slots with amazing animations and immersive sound.
Whether you’re a fan of minimal mechanics or love bonus-rich rounds, you’re sure to find a perfect match.
https://link.comhub.ru/includes/pages/?azorskie_ostrova_rayskiy_arhipelag_v_serdce_atlantiki.html
Each title are available anytime, with no installation, and well adapted for both desktop and smartphone.
In addition to games, the site includes slot guides, special offers, and player feedback to help you choose.
Register today, jump into the action, and get immersed in the thrill of online slots!
Здесь вам открывается шанс наслаждаться большим выбором слотов.
Эти слоты славятся живой визуализацией и захватывающим игровым процессом.
Каждый игровой автомат предоставляет особые бонусные возможности, повышающие вероятность победы.
1 win
Игра в игровые автоматы предназначена игроков всех уровней.
Есть возможность воспользоваться демо-режимом, и потом испытать азарт игры на реальные ставки.
Попробуйте свои силы и окунитесь в захватывающий мир слотов.
На данной платформе вы обнаружите интересные игровые слоты на платформе Champion.
Выбор игр представляет традиционные игры и современные слоты с яркой графикой и уникальными бонусами.
Любая игра разработан для комфортного использования как на компьютере, так и на планшетах.
Будь вы новичком или профи, здесь вы найдёте подходящий вариант.
сайт champion casino
Автоматы запускаются в любое время и работают прямо в браузере.
Также сайт предоставляет программы лояльности и обзоры игр, чтобы сделать игру ещё интереснее.
Попробуйте прямо сейчас и насладитесь азартом с казино Champion!
The site provides a large selection of pharmaceuticals for ordering online.
Users can easily access treatments from your device.
Our catalog includes both common medications and custom orders.
Everything is acquired via licensed distributors.
https://www.provenexpert.com/en-us/euroclinix-review/
We maintain user protection, with encrypted transactions and fast shipping.
Whether you’re filling a prescription, you’ll find safe products here.
Visit the store today and get stress-free access to medicine.
On this platform, you can discover a great variety of casino slots from leading developers.
Visitors can try out retro-style games as well as feature-packed games with high-quality visuals and interactive gameplay.
Whether you’re a beginner or an experienced player, there’s a game that fits your style.
play casino
Each title are ready to play 24/7 and optimized for PCs and smartphones alike.
You don’t need to install anything, so you can start playing instantly.
Platform layout is user-friendly, making it convenient to explore new games.
Sign up today, and dive into the excitement of spinning reels!
Here, you can find lots of slot machines from top providers.
Users can try out classic slots as well as modern video slots with stunning graphics and exciting features.
If you’re just starting out or an experienced player, there’s a game that fits your style.
money casino
All slot machines are ready to play anytime and optimized for desktop computers and mobile devices alike.
You don’t need to install anything, so you can jump into the action right away.
Platform layout is easy to use, making it simple to browse the collection.
Sign up today, and discover the thrill of casino games!
Mechanical watches will continue to be fashionable.
They symbolize craftsmanship and provide a level of detail that tech-based options simply fail to offer.
These watches is powered by complex gears, making it both accurate and inspiring.
Timepiece lovers appreciate the hand-assembled parts.
https://dailysandesh.com/?p=94870
Wearing a mechanical watch is not just about utility, but about expressing identity.
Their shapes are everlasting, often passed from generation to generation.
In short, mechanical watches will forever hold their place.
Did you know that nearly 50% of patients commit preventable pharmaceutical mishaps due to insufficient information?
Your wellbeing is your most valuable asset. Every medication decision you make plays crucial role in your long-term wellbeing. Staying educated about medical treatments is absolutely essential for disease prevention.
Your health depends on more than taking pills. All pharmaceutical products affects your body’s chemistry in potentially dangerous ways.
Never ignore these essential facts:
1. Mixing certain drugs can cause dangerous side effects
2. Over-the-counter pain relievers have potent side effects
3. Altering dosages undermines therapy
To avoid risks, always:
✓ Research combinations using official tools
✓ Study labels thoroughly when starting any medication
✓ Consult your doctor about correct dosage
___________________________________
For reliable drug information, visit:
https://community.alteryx.com/t5/user/viewprofilepage/user-id/576290
Our e-pharmacy offers an extensive variety of pharmaceuticals at affordable prices.
Customers can discover both prescription and over-the-counter remedies suitable for different health conditions.
Our goal is to keep high-quality products while saving you money.
Speedy and secure shipping ensures that your order is delivered promptly.
Enjoy the ease of shopping online through our service.
what is a generic drug
магазин аккаунтов социальных сетей перепродажа аккаунтов
безопасная сделка аккаунтов маркетплейс аккаунтов
аккаунт для рекламы купить аккаунт
гарантия при продаже аккаунтов покупка аккаунтов
маркетплейс аккаунтов продажа аккаунтов
покупка аккаунтов маркетплейс аккаунтов соцсетей
купить аккаунт с прокачкой маркетплейс аккаунтов соцсетей
This website offers you the chance to get in touch with experts for short-term risky projects.
Clients may easily request help for specific situations.
All listed individuals are qualified in executing intense jobs.
hitman-assassin-killer.com
This service guarantees discreet arrangements between users and workers.
If you require a quick solution, this platform is the right choice.
Submit a task and get matched with the right person today!
Il nostro servizio offre la selezione di persone per compiti delicati.
Gli utenti possono trovare professionisti specializzati per incarichi occasionali.
Tutti i lavoratori vengono verificati con attenzione.
ordina l’uccisione
Utilizzando il servizio è possibile visualizzare profili prima della scelta.
La qualità rimane la nostra priorità.
Contattateci oggi stesso per portare a termine il vostro progetto!
Account exchange Account Trading Platform
Account Market Sell accounts
Account Catalog Account Market
Account Selling Service Sell accounts
Sell accounts Find Accounts for Sale
Secure Account Purchasing Platform Secure Account Purchasing Platform
Sell Account https://buyagedaccounts001.com/
Account Sale Accounts market
Buy Account Buy Pre-made Account
Sell Account Ready-Made Accounts for Sale
Secure Account Purchasing Platform Account exchange
On this platform, you can discover a great variety of online slots from famous studios.
Visitors can experience retro-style games as well as new-generation slots with stunning graphics and exciting features.
If you’re just starting out or a casino enthusiast, there’s a game that fits your style.
casino games
The games are instantly accessible round the clock and designed for PCs and mobile devices alike.
All games run in your browser, so you can get started without hassle.
Site navigation is easy to use, making it simple to explore new games.
Join the fun, and discover the thrill of casino games!
account selling platform website for buying accounts
account acquisition account acquisition
account trading platform marketplace for ready-made accounts
profitable account sales secure account sales
verified accounts for sale secure account purchasing platform
account purchase secure account sales
account selling platform secure account purchasing platform
buy and sell accounts accounts market
secure account sales buy pre-made account
website for buying accounts account store
account market account selling service
purchase ready-made accounts account buying platform
ready-made accounts for sale account trading platform
sell accounts sell account
marketplace for ready-made accounts database of accounts for sale
accounts for sale sell account
account selling service sell account
gaming account marketplace account exchange
account purchase account trading platform
marketplace for ready-made accounts account trading platform
sell accounts account trading service
account trading account market
purchase ready-made accounts sell account
database of accounts for sale purchase ready-made accounts
Looking for a person to take on a single risky assignment?
Our platform specializes in connecting customers with workers who are willing to execute high-stakes jobs.
Whether you’re handling emergency repairs, hazardous cleanups, or risky installations, you’re at the right place.
Every available professional is vetted and qualified to ensure your safety.
hire a killer
This service offer transparent pricing, detailed profiles, and safe payment methods.
No matter how difficult the scenario, our network has the skills to get it done.
Begin your quest today and find the perfect candidate for your needs.
Here you can discover relevant knowledge about steps to becoming a digital intruder.
The materials are presented in a unambiguous and clear-cut manner.
You may acquire several procedures for bypassing protection.
Plus, there are practical examples that manifest how to apply these expertise.
how to learn hacking
Full details is continuously improved to keep up with the current breakthroughs in data safeguarding.
Special attention is focused on practical application of the developed competencies.
Keep in mind that all activities should be carried out conscientiously and for educational purposes only.
account catalog account market
website for selling accounts account buying service
This resource is available useful special offers for 1x betting.
These special offers allow to receive extra advantages when playing on the platform.
All available special codes are regularly updated to guarantee they work.
With these codes you can significantly increase your chances on the gaming site.
https://bhd.org.tr/article/lazernoe_udalenie_pigmentacii_koghi_hod_procedury_ee_posledstviya_i_osnovnye_protivopokaz.html
Plus, comprehensive manuals on how to implement promo deals are given for convenience.
Remember that particular bonuses may have expiration dates, so review terms before activating.
account selling service secure account purchasing platform
buy and sell accounts secure account purchasing platform
This page you can discover exclusive promo codes for a top-rated betting company.
The range of bonus opportunities is regularly updated to assure that you always have reach to the newest arrangements.
Via these coupons, you can save a lot on your bets and enhance your possibilities of victory.
All promo codes are diligently inspected for reliability and efficiency before getting posted.
https://marketingcreation.com/img/pgs/sovety_po_prohoghdeniyu_igry_gothic_3_prohoghdenie_igry_011.html
Furthermore, we offer complete guidance on how to utilize each bonus deal to boost your profits.
Note that some opportunities may have special provisions or time limitations, so it’s crucial to examine thoroughly all the aspects before taking advantage of them.
Welcome to our platform, where you can discover premium content created exclusively for grown-ups.
The entire collection available here is appropriate only for individuals who are over 18.
Make sure that you are eligible before proceeding.
teen selfie
Experience a unique selection of restricted materials, and immerse yourself today!
This online service provides a wide range of pharmaceuticals for easy access.
Customers are able to quickly get treatments with just a few clicks.
Our inventory includes everyday medications and custom orders.
Each item is supplied through licensed suppliers.
silagra how long to work
We maintain customer safety, with data protection and timely service.
Whether you’re looking for daily supplements, you’ll find affordable choices here.
Explore our selection today and enjoy convenient support.
account marketplace https://accounts-offer.org
account purchase https://accounts-marketplace.xyz/
account exchange service https://buy-best-accounts.org
database of accounts for sale https://accounts-marketplace.live
account trading https://social-accounts-marketplace.xyz/
account exchange service https://buy-accounts.space/
One X Bet stands as a premier online betting provider.
With a broad variety of matches, One X Bet serves millions worldwide.
The 1XBet app crafted intended for Android as well as iOS players.
https://clubgti.com/wp-content/pages/?kak_izgotovity_podsvechnik_svoimi_rukami.html
Players are able to download the application via the platform’s page as well as Play Store on Android devices.
Apple device owners, the app can be downloaded through the App Store easily.
guaranteed accounts buy accounts
The site provides a large selection of medical products for easy access.
Customers are able to easily buy essential medicines with just a few clicks.
Our inventory includes both common medications and more specific prescriptions.
All products is acquired via licensed pharmacies.
kamagra oral jelly how long to work
We maintain customer safety, with encrypted transactions and prompt delivery.
Whether you’re filling a prescription, you’ll find trusted options here.
Start your order today and enjoy convenient access to medicine.
account market accounts marketplace
sell pre-made account https://buy-accounts.live
social media account marketplace accounts market
1xBet Promo Code – Exclusive Bonus up to $130
Use the One X Bet promo code: Code 1XBRO200 when registering via the application to unlock exclusive rewards given by One X Bet for a 130 Euros maximum of 100%, for wagering plus a $1950 with 150 free spins. Start the app then continue through the sign-up process.
This One X Bet promo code: 1XBRO200 gives an amazing welcome bonus for new users — 100% maximum of $130 during sign-up. Promotional codes serve as the key to unlocking extra benefits, and One X Bet’s bonus codes aren’t different. When applying this code, users may benefit from multiple deals in various phases in their gaming adventure. Though you’re not eligible for the welcome bonus, 1xBet India makes sure its regular customers receive gifts through regular bonuses. Visit the Offers page on their website frequently to keep informed about current deals designed for loyal customers.
https://fashion.clinicalkeynote.com/the-trump-world-wide-web-plan-toll-in-2021-3806306521746755161
What 1XBet promotional code is presently available at this moment?
The bonus code for 1XBet stands as Code 1XBRO200, permitting new customers registering with the bookmaker to gain a reward of 130 dollars. For gaining exclusive bonuses pertaining to gaming and wagering, kindly enter this special code concerning 1XBET during the sign-up process. In order to benefit of this offer, future players must input the bonus code 1XBET while signing up procedure to receive a full hundred percent extra on their initial deposit.
В данном ресурсе вы можете найти свежие бонусы для Melbet.
Примените коды во время создания аккаунта в системе чтобы получить максимальную награду на первый депозит.
Также, здесь представлены промокоды для текущих акций для лояльных участников.
промокод при регистрации мелбет
Обновляйте информацию в рубрике акций, и будьте в курсе эксклюзивные бонусы от Melbet.
Все промокоды обновляется на работоспособность, что гарантирует надежность при использовании.
database of accounts for sale https://accounts-marketplace-best.pro
маркетплейс аккаунтов https://akkaunty-na-prodazhu.pro
маркетплейс аккаунтов соцсетей rynok-akkauntov.top
продать аккаунт https://kupit-akkaunt.xyz/
Here, you can easily find interactive video sessions.
Whether you’re looking for engaging dialogues career-focused talks, the site offers options for any preference.
The video chat feature developed to foster interaction from around the world.
With high-quality video along with sharp sound, each interaction feels natural.
You can join community hubs initiate one-on-one conversations, depending on your preferences.
https://rt.maturecams.pw/couples
All you need consistent online access plus any compatible tool to get started.
покупка аккаунтов akkaunt-magazin.online
продажа аккаунтов https://akkaunty-market.live/
маркетплейс аккаунтов соцсетей https://kupit-akkaunty-market.xyz/
площадка для продажи аккаунтов https://akkaunty-optom.live
биржа аккаунтов https://online-akkaunty-magazin.xyz/
площадка для продажи аккаунтов https://akkaunty-dlya-prodazhi.pro/
На этом сайте доступны видеообщение в реальном времени.
Вы хотите дружеское общение переговоры, на платформе представлены варианты для всех.
Этот инструмент предназначена для связи людей из разных уголков планеты.
пары эро чат
За счет четких изображений и превосходным звуком, вся беседа становится увлекательным.
Вы можете присоединиться к публичным комнатам или начать личный диалог, исходя из ваших потребностей.
Единственное условие — надежная сеть и любое поддерживаемое устройство, чтобы начать.
продажа аккаунтов https://kupit-akkaunt.online/
This website, you can find lots of casino slots from top providers.
Users can try out traditional machines as well as modern video slots with stunning graphics and interactive gameplay.
Even if you’re new or a seasoned gamer, there’s a game that fits your style.
casino
Each title are instantly accessible round the clock and designed for PCs and tablets alike.
No download is required, so you can get started without hassle.
Platform layout is user-friendly, making it simple to explore new games.
Sign up today, and enjoy the world of online slots!
Handcrafted mechanical watches remain the epitome of timeless elegance.
In a world full of modern gadgets, they still hold their sophistication.
Designed with precision and mastery, these timepieces reflect true horological mastery.
Unlike fleeting trends, fine mechanical watches do not go out of fashion.
https://telegra.ph/Top-7-Online-Luxury-Watch-Stores-in-Dubai-03-07
They symbolize heritage, tradition, and enduring quality.
Whether worn daily or saved for special occasions, they forever remain in style.
buy fb ad account buy facebook ads manager
buy fb ad account https://buy-ad-accounts.click
buy facebook account for ads https://buy-ad-account.top
buy aged facebook ads account https://buy-ads-account.click
Here, you can discover a wide range of online casinos.
Whether you’re looking for well-known titles new slot machines, you’ll find an option for every player.
The listed platforms fully reviewed to ensure security, so you can play securely.
play slots
Additionally, the platform unique promotions and deals for new players as well as regulars.
Thanks to user-friendly browsing, locating a preferred platform happens in no time, enhancing your experience.
Be in the know about the latest additions through regular check-ins, as fresh options appear consistently.
buy fb account https://ad-account-buy.top/
facebook accounts for sale https://buy-ads-account.work
facebook ad account buy fb accounts for sale
buying fb accounts buy aged fb account
sell google ads account old google ads account for sale
google ads agency account buy https://buy-ads-accounts.click
buy facebook account cheap facebook account
google ads agency accounts https://ads-account-for-sale.top
google ads account for sale https://ads-account-buy.work
This flight-themed slot combines exploration with big wins.
Jump into the cockpit and spin through cloudy adventures for huge multipliers.
With its classic-inspired graphics, the game captures the spirit of pioneering pilots.
aviator betting game download
Watch as the plane takes off – cash out before it vanishes to lock in your earnings.
Featuring instant gameplay and immersive sound effects, it’s a must-try for casual players.
Whether you’re testing luck, Aviator delivers endless action with every flight.
buy google ad threshold account https://buy-ads-invoice-account.top
buy adwords account buy google ads verified account
google ads reseller https://buy-ads-agency-account.top
buy google ads threshold accounts https://sell-ads-account.click
google ads account seller https://ads-agency-account-buy.click
本网站 提供 海量的 成人材料,满足 成年访客 的 兴趣。
无论您喜欢 哪一类 的 影片,这里都 种类齐全。
所有 内容 都经过 严格审核,确保 高清晰 的 浏览感受。
同性恋者
我们支持 不同平台 访问,包括 电脑,随时随地 畅享内容。
加入我们,探索 激情时刻 的 成人世界。
fb bussiness manager buy-business-manager.org
buy google ads accounts buy-verified-ads-account.work
verified facebook business manager for sale buy facebook business manager accounts
buy verified business manager facebook https://buy-business-manager-acc.org
buy facebook bm https://buy-verified-business-manager-account.org/
verified bm https://buy-verified-business-manager.org/
facebook bm buy https://business-manager-for-sale.org/
buy verified business manager https://buy-business-manager-verified.org/
facebook bm account buy https://buy-bm.org/
On this site, you can discover a wide range virtual gambling platforms.
Whether you’re looking for traditional options latest releases, there’s a choice for any taste.
The listed platforms fully reviewed for trustworthiness, allowing users to gamble securely.
1xbet
Moreover, this resource unique promotions and deals for new players and loyal customers.
Due to simple access, locating a preferred platform takes just moments, saving you time.
Be in the know about the latest additions through regular check-ins, because updated platforms are added regularly.
facebook business manager account buy facebook verified business manager for sale
buy tiktok ad account https://buy-tiktok-ads-account.org
tiktok ad accounts https://tiktok-ads-account-buy.org
Here, you can discover a variety of online casinos.
Searching for well-known titles latest releases, there’s something for any taste.
The listed platforms are verified to ensure security, so you can play peace of mind.
play slots
Moreover, the site offers exclusive bonuses along with offers for new players and loyal customers.
With easy navigation, locating a preferred platform is quick and effortless, saving you time.
Stay updated on recent updates with frequent visits, because updated platforms come on board often.
buy tiktok ads tiktok ads account for sale
tiktok ads account buy https://tiktok-agency-account-for-sale.org
buy tiktok ads https://buy-tiktok-ad-account.org
tiktok ad accounts https://buy-tiktok-ads-accounts.org
tiktok ads account for sale https://buy-tiktok-business-account.org
buy tiktok ads account https://buy-tiktok-ads.org
tiktok ad accounts https://tiktok-ads-agency-account.org
На нашей платформе интимные фото и ролики.
Контент подходит для личного просмотра.
У нас собраны множество категорий.
Платформа предлагает лучшие материалы в сети.
порно ролики смотреть онлайн бесплатно
Вход разрешен после подтверждения возраста.
Наслаждайтесь эксклюзивным контентом.
Модные образы для торжеств 2025 года вдохновляют дизайнеров.
Актуальны кружевные рукава и корсеты из полупрозрачных тканей.
Блестящие ткани делают платье запоминающимся.
Асимметричные силуэты становятся хитами сезона.
Минималистичные силуэты подчеркивают элегантность.
Ищите вдохновение в новых коллекциях — стиль и качество превратят вас в звезду вечера!
https://naphopibun.go.th/forum/suggestion-box/931050-u-lini-sv-d-bni-pl-ija-e-g-g-d-s-v-i-p-vib-ru
Здесь доступны вспомогательные материалы для школьников.
Все школьные дисциплины в одном месте включая естественные науки.
Подготовьтесь к экзаменам благодаря интерактивным заданиям.
https://mozaika.biz/present/552749-reshebnik-idealnyy-putevoditel-shkolnika-v-mir-znaniy.html
Примеры решений объяснят сложные моменты.
Доступ свободный для комфортного использования.
Применяйте на уроках и повышайте успеваемость.
Модные образы для торжеств 2025 года задают новые стандарты.
Актуальны кружевные рукава и корсеты из полупрозрачных тканей.
Детали из люрекса создают эффект жидкого металла.
Асимметричные силуэты возвращаются в моду.
Особый акцент на открытые плечи создают баланс между строгостью и игрой.
Ищите вдохновение в новых коллекциях — оригинальность и комфорт сделают ваш образ идеальным!
https://nonghuachang-sao.go.th/forum/suggestion-box/405424-r-nd-vi-sv-d-bni-f-s-ni-s-ic-s-s-v-i-p-vib-ru
The Audemars Piguet Royal Oak 16202ST features a elegant stainless steel 39mm case with an extra-thin design of just 8.1mm thickness, housing the advanced Calibre 7121 movement. Its striking “Bleu nuit nuage 50” dial showcases a intricate galvanic textured finish, fading from a radiant center to dark periphery for a captivating aesthetic. The octagonal bezel with hexagonal screws pays homage to the original 1972 design, while the glareproofed sapphire crystal ensures optimal legibility.
https://www.tumblr.com/sneakerizer/785061992327233537/audemars-piguet-royal-oak-26315st-a-dance-of
Water-resistant to 50 meters, this “Jumbo” model balances sporty durability with luxurious refinement, paired with a steel link strap and reliable folding buckle. A contemporary celebration of classic design, the 16202ST embodies Audemars Piguet’s craftsmanship through its meticulous mechanics and timeless Royal Oak DNA.
Здесь можно получить мессенджер-бот “Глаз Бога”, который проверить всю информацию по человеку из открытых источников.
Бот работает по номеру телефона, анализируя актуальные базы онлайн. С его помощью можно получить 5 бесплатных проверок и полный отчет по запросу.
Платформа проверен на август 2024 и охватывает аудио-материалы. Сервис поможет узнать данные по госреестрам и покажет сведения за секунды.
https://glazboga.net/
Это сервис — выбор в анализе граждан через Telegram.
¿Necesitas cupones recientes de 1xBet? Aquí descubrirás recompensas especiales para apostar .
El promocódigo 1x_12121 garantiza a un bono de 6500 rublos durante el registro .
Además , canjea 1XRUN200 y disfruta un bono máximo de 32500 rublos .
https://pgonline.ru/forums/index.php?topic=147811.new#new
Mantente atento las novedades para acumular ventajas exclusivas.
Los promocódigos listados son verificados para 2025 .
No esperes y maximiza tus oportunidades con 1xBet !
Здесь можно получить мессенджер-бот “Глаз Бога”, позволяющий найти данные по человеку из открытых источников.
Сервис активно ищет по фото, используя публичные материалы в Рунете. Через бота осуществляется 5 бесплатных проверок и глубокий сбор по запросу.
Инструмент актуален согласно последним данным и включает мультимедийные данные. Глаз Бога сможет найти профили по госреестрам и предоставит информацию мгновенно.
https://glazboga.net/
Такой инструмент — помощник для проверки людей через Telegram.
Здесь доступен мессенджер-бот “Глаз Бога”, что найти данные о человеке по публичным данным.
Инструмент функционирует по номеру телефона, анализируя актуальные базы онлайн. Через бота доступны 5 бесплатных проверок и глубокий сбор по запросу.
Платформа обновлен на август 2024 и поддерживает аудио-материалы. Сервис поможет узнать данные в соцсетях и покажет информацию за секунды.
https://glazboga.net/
Такой бот — выбор при поиске граждан через Telegram.
¿Necesitas promocódigos vigentes de 1xBet? En este sitio encontrarás recompensas especiales en apuestas deportivas .
El promocódigo 1x_12121 te da acceso a un bono de 6500 rublos al registrarte .
También , activa 1XRUN200 y disfruta un bono máximo de 32500 rublos .
https://1xbet-free-bet-promo-code.technetbloggers.de/explore-1xbet-promo-codes-for-enhanced-betting-in-2025-1749138390
Revisa las ofertas diarias para acumular ventajas exclusivas.
Los promocódigos listados funcionan al 100% para hoy .
No esperes y maximiza tus oportunidades con la casa de apuestas líder !
Здесь вы можете найти самыми свежими новостями страны и зарубежья .
Информация поступает ежеминутно .
Доступны видеохроники с мест событий .
Аналитические статьи помогут глубже изучить тему .
Контент предоставляется без регистрации .
https://fashionsecret.ru
Looking for latest 1xBet promo codes? Our platform offers working bonus codes like 1XRUN200 for registrations in 2024. Claim €1500 + 150 FS as a welcome bonus.
Use official promo codes during registration to maximize your bonuses. Enjoy risk-free bets and special promotions tailored for sports betting.
Find daily updated codes for 1xBet Kazakhstan with fast withdrawals.
Every voucher is tested for accuracy.
Grab limited-time offers like GIFT25 to increase winnings.
Active for first-time deposits only.
https://www.thestudentpocketguide.com/author/promocional03/
Enjoy seamless benefits with easy redemption.
The Audemars Piguet Royal Oak, redefined luxury watchmaking with its signature angular case and bold integration of sporty elegance.
Available in limited-edition sand gold to skeleton dials , the collection combines avant-garde design with horological mastery.
Priced from $20,000 to over $400,000, these timepieces cater to both seasoned collectors and aficionados seeking investable art .
Pre-loved Audemars Piguet Oak 26240 reviews
The Perpetual Calendar models push boundaries with innovative complications , showcasing Audemars Piguet’s relentless innovation.
Thanks to meticulous hand-finishing , each watch reflects the brand’s commitment to excellence .
Explore certified pre-owned editions and historical insights to elevate your collection with this timeless icon .
Die Royal Oak 16202ST kombiniert ein 39-mm-Edelstahlgehäuse mit einem extraflachen Gehäuse von nur 8,1 mm Dicke.
Ihr Herzstück bildet das automatische Manufakturwerk 7121 mit 55 Stunden Gangreserve.
Der smaragdene Farbverlauf des Zifferblatts wird durch das feine Guillochierungen und die Saphirglas-Abdeckung mit blendschutzbeschichteter Oberfläche betont.
Neben Stunden- und Minutenanzeige bietet die Uhr ein praktisches Datum bei Position 3.
Audemars Royal Oak 15202st armbanduhren
Die bis 5 ATM geschützte Konstruktion macht sie für sportliche Einsätze geeignet.
Das geschlossene Stahlband mit faltsicherer Verschluss und die oktogonale Lünette zitieren das ikonische Royal-Oak-Erbe aus den 1970er Jahren.
Als Teil der „Jumbo“-Kollektion verkörpert die 16202ST horlogerie-Tradition mit einem Wertanlage für Sammler.
Коллекция Nautilus, созданная Жеральдом Гентой, сочетает элегантность и прекрасное ремесленничество. Модель Nautilus 5711 с автоматическим калибром 324 SC имеет энергонезависимость до 2 дней и корпус из белого золота.
Восьмиугольный безель с плавными скосами и синий солнечный циферблат подчеркивают неповторимость модели. Браслет с H-образными элементами обеспечивает комфорт даже при повседневном использовании.
Часы оснащены индикацией числа в позиции 3 часа и антибликовым покрытием.
Для сложных модификаций доступны хронограф, лунофаза и функция Travel Time.
Найти часы Patek Philippe Nautilus отзывы
Например, модель 5712/1R-001 из розового золота с механизмом на 265 деталей и запасом хода до 48 часов.
Nautilus остается символом статуса, объединяя современные технологии и классические принципы.
Betting is becoming an thrilling way to enhance your entertainment. Engaging with football, our platform offers great opportunities for each user.
With in-play wagering to early markets, you can find a broad selection of wagering choices tailored to your needs. The easy-to-use design ensures that engaging in betting is both straightforward and reliable.
https://gazetablic.com/new/?888starz_c_te_d_ivoire___paris_sportifs___casino_en_ligne_avec_bonus_jusqu___990_000_xof.html
Sign up today to enjoy the best betting experience available on the web.
Монтаж систем видеонаблюдения поможет защиту территории круглосуточно.
Продвинутые системы обеспечивают четкую картинку даже при слабом освещении.
Вы можете заказать множество решений систем, подходящих для офиса.
videonablyudeniemoskva.ru
Качественный монтаж и сервисное обслуживание обеспечивают эффективным и комфортным для каждого клиента.
Свяжитесь с нами, для получения оптимальное предложение по внедрению систем.
На данном сайте доступен мессенджер-бот “Глаз Бога”, что найти сведения о гражданине через открытые базы.
Бот активно ищет по ФИО, обрабатывая публичные материалы онлайн. Через бота можно получить 5 бесплатных проверок и глубокий сбор по фото.
Сервис обновлен на 2025 год и включает фото и видео. Бот гарантирует проверить личность в соцсетях и предоставит информацию в режиме реального времени.
глаз бога телеграмм бесплатно
Такой сервис — выбор в анализе граждан онлайн.
Здесь можно получить мессенджер-бот “Глаз Бога”, позволяющий собрать данные по человеку из открытых источников.
Бот работает по ФИО, обрабатывая актуальные базы онлайн. Благодаря ему доступны бесплатный поиск и глубокий сбор по запросу.
Сервис обновлен согласно последним данным и включает аудио-материалы. Сервис сможет проверить личность в открытых базах и предоставит сведения за секунды.
официальный глаз бога
Это инструмент — идеальное решение в анализе граждан через Telegram.
À la recherche des jeux en ligne ? Ce site propose une sélection variée pour tous les goûts .
Des jeux de cartes aux défis multijoueurs , plongez des mécaniques innovantes sans téléchargement .
Découvrez les nouveautés comme le Sudoku ou des aventures dynamiques en équipe.
Les amateurs de sport, des courses automobiles en 3D réaliste vous attendent.
iihfworLds2016.com/fr/alexander-casino
Profitez d’expériences premium et connectez-vous des joueurs passionnés.
Quel que soit la réflexion , ce site s’impose comme une référence incontournable.
Здесь можно получить Telegram-бот “Глаз Бога”, позволяющий найти данные по человеку через открытые базы.
Инструмент активно ищет по фото, используя публичные материалы в сети. Через бота доступны 5 бесплатных проверок и детальный анализ по запросу.
Сервис обновлен согласно последним данным и поддерживает аудио-материалы. Глаз Бога гарантирует найти профили в открытых базах и предоставит информацию в режиме реального времени.
глаз бога телеграм бесплатно
Это сервис — выбор для проверки граждан онлайн.
Этот бот поможет получить информацию о любом человеке .
Достаточно ввести имя, фамилию , чтобы получить сведения .
Бот сканирует открытые источники и цифровые следы.
глаз бога телеграмм бесплатно
Результаты формируются в реальном времени с фильтрацией мусора.
Идеально подходит для проверки партнёров перед сотрудничеством .
Конфиденциальность и актуальность информации — наш приоритет .
Наш сервис поможет получить информацию о любом человеке .
Достаточно ввести никнейм в соцсетях, чтобы получить сведения .
Система анализирует открытые источники и активность в сети .
программа глаз бога для поиска людей
Результаты формируются мгновенно с фильтрацией мусора.
Оптимален для проверки партнёров перед сотрудничеством .
Анонимность и точность данных — наш приоритет .
Хотите собрать информацию о человеке ? Этот бот предоставит детальный отчет в режиме реального времени .
Используйте уникальные алгоритмы для поиска публичных записей в открытых источниках.
Узнайте место работы или интересы через систему мониторинга с гарантией точности .
глаз бога найти телефон
Система функционирует с соблюдением GDPR, обрабатывая открытые данные .
Получите расширенный отчет с историей аккаунтов и списком связей.
Попробуйте проверенному решению для исследований — результаты вас удивят !
На данном сайте предоставляется сведения по запросу, в том числе подробные профили.
Базы данных содержат персон любой возрастной категории, статусов.
Информация собирается по официальным записям, что гарантирует достоверность.
Обнаружение осуществляется по контактным данным, что делает использование удобным.
глаз бога бесплатно
Дополнительно доступны контакты а также полезная информация.
Работа с информацией обрабатываются в рамках норм права, обеспечивая защиту утечек.
Используйте данному ресурсу, чтобы найти искомые данные в кратчайшие сроки.
На данном сайте можно найти информация о любом человеке, включая исчерпывающие сведения.
Базы данных содержат граждан разного возраста, статусов.
Сведения формируются на основе публичных данных, обеспечивая достоверность.
Поиск выполняется по фамилии, что делает процесс удобным.
глаз бога актуальный бот
Дополнительно предоставляются места работы и другая полезная информация.
Работа с информацией проводятся в соответствии с законодательства, предотвращая разглашения.
Используйте этому сайту, в целях получения необходимую информацию максимально быстро.
При выборе семейного врача важно учитывать на его опыт , умение слушать и удобные часы приема.
Убедитесь, что медицинский центр удобна в доезде и предоставляет полный спектр услуг .
Узнайте , работает ли доктор с вашей полисом, и какова загруженность расписания.
http://www.deonnyn.com/PSPA/viewtopic.php?f=8&t=46547
Оценивайте рекомендации знакомых, чтобы понять уровень доверия .
Не забудьте наличие профильного образования, аккредитацию клиники для уверенности в качестве лечения.
Выбирайте — тот, где примут во внимание ваши нужды , а процесс лечения будет комфортным .
На данном сайте доступна данные о любом человеке, в том числе полные анкеты.
Базы данных содержат людей всех возрастов, статусов.
Сведения формируются из открытых источников, что гарантирует достоверность.
Обнаружение выполняется по контактным данным, сделав процесс быстрым.
глаз бога узнать номер
Дополнительно можно получить места работы и другая важные сведения.
Обработка данных проводятся в рамках правовых норм, что исключает утечек.
Воспользуйтесь предложенной системе, в целях получения искомые данные максимально быстро.
Нужно найти информацию о пользователе? Наш сервис поможет полный профиль в режиме реального времени .
Используйте продвинутые инструменты для поиска цифровых следов в соцсетях .
Выясните место работы или интересы через автоматизированный скан с верификацией результатов.
bot глаз бога
Бот работает в рамках закона , используя только общедоступную информацию.
Получите детализированную выжимку с геолокационными метками и списком связей.
Попробуйте проверенному решению для исследований — точность гарантирована!
Хотите найти информацию о человеке ? Наш сервис поможет детальный отчет мгновенно.
Используйте продвинутые инструменты для анализа цифровых следов в открытых источниках.
Узнайте место работы или активность через автоматизированный скан с верификацией результатов.
найти через глаз бога
Система функционирует в рамках закона , обрабатывая общедоступную информацию.
Получите детализированную выжимку с историей аккаунтов и графиками активности .
Доверьтесь проверенному решению для digital-расследований — точность гарантирована!
Биорезервуар — это водонепроницаемый резервуар, предназначенная для сбора и частичной переработки отходов.
Принцип действия заключается в том, что жидкость из дома направляется в ёмкость, где формируется слой ила, а жиры и масла собираются в верхнем слое.
В конструкцию входят входная труба, герметичный бак , соединительный канал и почвенный фильтр для дочистки воды .
https://profconnect.ru/communication/forum/user/46302/
Преимущества: низкие затраты , минимальное обслуживание и безопасность для окружающей среды при соблюдении норм.
Однако важно не перегружать систему , иначе неотделённые примеси попадут в грунт, вызывая загрязнение.
Материалы изготовления: бетонные блоки, полиэтиленовые резервуары и композитные баки для индивидуальных нужд.
책임 있는 게임(이)란 온라인 도박 분야에서 피해를 방지하며 안전하고 공정한 환경을 조성하는 원칙과 실천을 의미합니다.
핵심 목표는 플레이어 보호 과 규제 준수 을 통해 산업 신뢰성 강화 를 이루는 것입니다.
제공자는 자가 배제 프로그램 과 시간 관리 도구 같은 사전 통제 시스템 을 의무적으로 제공해야 합니다.
https://jgmt.kr/
이러한 노력은 기업 이미지 개선 과 규제 당국과의 협력이라는 이중 효과를 가져옵니다.
명확한 결제 정보와 실시간 행동 모니터링 은 불공정 행위 차단에 핵심적인 역할을 합니다.
발전 방향으로는 AI 기반 위험 탐지 과 개인 맞춤형 경고 시스템 도입이 필수적입니다.
La montre connectée Garmin fēnix® Chronos est un modèle haut de gamme qui combine les fonctionnalités GPS à un style raffiné grâce à ses matériaux premium .
Conçue pour les activités variées, cette montre s’adresse aux sportifs exigeants grâce à sa polyvalence et sa connectivité avancée .
Grâce à sa durée d’utilisation jusqu’à 6 heures , elle s’impose comme une solution fiable pour les aventures en extérieur .
Ses fonctions de suivi incluent le sommeil et les étapes parcourues, idéal pour les passionnés de santé.
Facile à configurer , la fēnix® Chronos s’intègre parfaitement à votre style de vie , tout en conservant un look élégant .
https://garmin-boutique.com
Подбирая компании для квартирного переезда важно проверять её наличие страховки и опыт работы .
Изучите отзывы клиентов или рекомендации знакомых , чтобы оценить надёжность исполнителя.
Уточните стоимость услуг, учитывая расстояние перевозки , сезонность и дополнительные опции .
http://forum.anime.org.ua/bbs/showthread.php?p=156381#post156381
Требуйте наличия гарантий сохранности имущества и запросите детали компенсации в случае повреждений.
Оцените уровень сервиса: оперативность ответов, гибкость графика .
Проверьте, есть ли специализированные грузчики и защитные технологии для безопасной транспортировки.
В нашей коллекции доступны авторские видеоматериалы моделей, созданные с профессиональным подходом.
Контент включает портфолио , редкие материалы, тематические подборки для узких интересов.
Все данные проверяются перед публикацией, чтобы гарантировать качество и актуальность .
pornhub
Для удобства пользователей добавлены категории жанров, параметрам моделей.
Платформа соблюдает конфиденциальность и соблюдение лицензий согласно международным нормам .
Back then, I believed medicine was straightforward. Doctors give you pills — you don’t question the process. It felt official. Eventually, it didn’t feel right.
First came the fatigue. I told myself “this is normal”. Still, my body kept rejecting the idea. I searched forums. The warnings were there — just buried in jargon.
amoxil uses
I started seeing: health isn’t passive. The reaction isn’t always immediate, but it’s real. Damage accumulates. Still we trust too easily.
Now I question more. Not because I don’t trust science. I challenge assumptions. But I don’t care. I’m not trying to be difficult — I’m trying to stay alive. The turning point, it would be keyword.
Haute Horlogerie steht für exzellente Uhrmacherei mit handwerklicher Perfektion , die innovative Technik verbindet.
Die Mechanik wird per Hand veredelt , von Sonnenschliff bis zu geschliffenen Kanten , was Luxusuhren einzigartig macht.
Schweizer Manufakturen kombinieren ästhetische Designs mit präzisen Uhrwerken , um zeitlose Eleganz zu schaffen.
uhr patek philip
Herstellung erfordert Jahre des Know-hows , mit seltenen Komponenten, die Langlebigkeit garantieren.
Hochwertige Uhrmacherei ist nicht nur Funktionalität – sie ist ein Symbol für Status , das Innovation fördert.
facebook accounts to buy sell account marketplace for ready-made accounts
Rolex Submariner, представленная в 1953 году стала первой дайверской моделью, выдерживающими глубину до 100 метров .
Модель имеет 60-минутную шкалу, Triplock-заводную головку, обеспечивающие герметичность даже в экстремальных условиях.
Дизайн включает хромалитовый циферблат , стальной корпус Oystersteel, подчеркивающие спортивный стиль.
Наручные часы Ролекс Субмаринер цены
Автоподзавод до 70 часов сочетается с перманентной работой, что делает их идеальным выбором для активного образа жизни.
За десятилетия Submariner стал эталоном дайверских часов , оцениваемым как эксперты.
buy facebook accounts for ads accounts for sale account selling service
La gamme MARQ® de Garmin incarne l’excellence horlogère avec des matériaux premium comme le titane Grade-5 et connectivité avancée .
Adaptée aux activités variées, elle allie robustesse et autonomie prolongée , idéale pour les entraînements intensifs grâce à ses outils de navigation .
Grâce à son autonomie allant jusqu’à 6 heures , cette montre s’impose comme une solution fiable , même lors de activités exigeantes.
garmin venu 2
Les outils de suivi incluent le comptage des calories brûlées, accompagnées de notifications intelligentes , pour les amateurs de fitness .
Intuitive à utiliser, elle s’intègre à votre quotidien , avec un écran AMOLED lumineux et compatibilité avec les apps mobiles .
Zodpovědný hazard znamená kontrolu nad vlastními návyky , aby se minimalizovalo riziko závislosti a zároveň se uchovala zábavní hodnota.
Platformy umožňují nastavit denní týdenní nebo měsíční limity , což pomáhá hráčům udržet finanční disciplínu .
Každý hráč by měl znát svá práva , jako jsou pokusy o návrat prohraných prostředků.
mostbet přihlášení
Online kasina jsou povinna zajišťovat bezpečné prostředí, aby chránila zranitelné skupiny před nežádoucím vlivem.
V případě potřeby lze využít linků na terapii , které pomáhají při překonání hráčské vášně.
Launched in 1972, the Royal Oak reshaped luxury watchmaking with its iconic octagonal bezel and bold integration of sporty elegance .
Spanning styles like classic stainless steel to meteorite-dial editions, the collection combines avant-garde aesthetics with horological mastery .
Starting at $20,000 to over $400,000, these timepieces attract both veteran enthusiasts and newcomers seeking wearable heritage .
https://bookmarkloves.com/story22198482/watches-audemars-piguet-royal-oak-luxury
The Code 11.59 series redefine standards with robust case constructions , showcasing Audemars Piguet’s technical prowess .
With ultra-thin calibers like the 2385, each watch celebrates the brand’s legacy of craftsmanship .
Explore historical milestones and collector-grade materials to elevate your collection .
Женская сумка — это ключевой элемент гардероба, которая подчеркивает индивидуальность каждой дамы.
Сумка способна нести личные предметы и организовывать личные задачи.
Благодаря разнообразию форм и цветовой гаммы она дополняет ваш стиль.
сумки Balenciaga
Это символ хорошего вкуса, который демонстрирует уровень достатка своей хозяйки.
Каждая модель повествует историю через материалы, раскрывая внутренний мир женщины.
От миниатюрных клатчей до вместительных тоутов — сумка подстраивается под любую ситуацию.
Бренд Balenciaga известен уникальными сумками , созданными фирменной эстетикой.
Каждый аксессуар обладает необычными формами , такие как массивные застежки .
Применяемые ткани обеспечивают премиальное качество сумки.
https://sites.google.com/view/sumki-balenciaga/index
Узнаваемость дизайна увеличивается у знаменитостей , обеспечивая каждую покупку частью стиля.
Сезонные новинки дают возможность владельцу заявить о вкусе в компании .
Отдавая предпочтение аксессуары бренда, вы инвестируете модный акцент , и часть истории .
Аксессуары Prada считаются символом роскоши за счёт их уникальному дизайну .
Используемые материалы обеспечивают надёжность , а детальная обработка подчёркивает мастерство бренда.
Лаконичный дизайн дополняются знаковым логотипом , создавая современный облик.
https://sites.google.com/view/sumkiprada/index
Такие сумки универсальны в деловой среде , демонстрируя практичность при любом ансамбле.
Ограниченные серии подчеркивают статус владельца , превращая каждую модель в must-have сезона .
Опираясь на историю бренд развивает новые решения, сохраняя классическому шарму до мельчайших элементов.
I once believed pills as saviors, reaching for them instinctively whenever discomfort arose. However, reality dawned slowly, revealing how such interventions merely veiled deeper issues, sparking a quest for true understanding into our intricate dance with health. The shift was visceral, compelling me that conscious choices in medicine empowers our innate vitality, rather than diminishing it.
During a stark health challenge, I turned inward instead of outward, uncovering hidden layers that blended self-care with selective support. This revelation reshaped my world: true mending demands awareness, blind trust weakens resilience. This journey fuels my passion to embrace a fuller perspective, recognizing treatments as enhancers of life.
Peering into the core, I now understand medical means ought to amplify our spirit, not overshadow it. It’s a tapestry of growth, inviting us to question entrenched patterns for deeper connections. It all comes down to one thing: kamagra 200mg
Бренд Longchamp — это эталон стиля , где сочетаются вечные ценности и современные тенденции .
Изготовленные из эксклюзивных материалов, они выделяются функциональностью .
Сумки-трансформеры остаются востребованными у путешественников уже много лет .
https://sites.google.com/view/sumki-longchamp/all
Каждая сумка ручной работы подчеркивает хороший вкус, оставаясь практичность в повседневных задачах.
Бренд следует наследию, используя современные методы при поддержании качества.
Выбирая Longchamp, вы получаете стильный аксессуар , а становитесь частью легендарное сообщество.
Shimmering liquid textiles dominate 2025’s fashion landscape, blending cyberpunk-inspired aesthetics with eco-conscious craftsmanship for runway-ready statements .
Unisex tailoring break traditional boundaries , featuring modular designs that adapt to personal style across formal occasions.
Algorithm-generated prints human creativity, creating one-of-a-kind textures that shift in sunlight for dynamic visual storytelling .
https://cittaviva.net/read-blog/13216
Zero-waste construction lead the industry , with biodegradable textiles reducing environmental impact without compromising bold design elements.
Light-refracting details elevate minimalist outfits , from nano-embroidered handbags to self-cleaning fabrics designed for modern practicality .
Retro nostalgia fused with innovation defines the year, as 2000s logomania reinterpret archives through climate-responsive materials for forward-thinking style.
Bold metallic fabrics dominate 2025’s fashion landscape, blending cyberpunk-inspired aesthetics with eco-conscious craftsmanship for runway-ready statements .
Gender-fluid silhouettes break traditional boundaries , featuring asymmetrical cuts that transform with movement across formal occasions.
AI-curated patterns human creativity, creating one-of-a-kind textures that shift in sunlight for dynamic visual storytelling .
https://blogool.com/article/what-are-aggregators-and-how-they-help-save-money-on-online-shopping
Circular fashion techniques lead the industry , with biodegradable textiles celebrating resourcefulness without compromising bold design elements.
Light-refracting details elevate minimalist outfits , from solar-powered jewelry to 3D-printed footwear designed for modern practicality .
Vintage revival meets techwear defines the year, as 90s grunge textures reimagine classics through smart fabric technology for timeless relevance .
Das Rolex Cosmograph Daytona-Modell ist ein Meisterwerk der chronographischen Präzision , vereint sportliches Design mit höchster Funktionalität durch seine Tachymeterskala .
Verfügbar in Weißgold überzeugt die Uhr durch ihre zeitlose Ästhetik und hochwertige Materialien , die passionierte Sammler überzeugen.
Dank einer Batterie von 72 Stunden ist sie ideal für sportliche Herausforderungen und zeigt sich als zuverlässiger Begleiter unter extremsten Umständen.
Cosmograph Daytona 116509 armbanduhr
Die ikonischen Unterzifferblätter mit Perlmutt-Einsätzen betonen den sportiven Charakter , während die wasserdichte Konstruktion Langlebigkeit garantieren .
Seit ihrer Einführung 1963 bleibt sie ein Symbol für Ambition , geschätzt für den exklusiven Status bei Investoren weltweit.
Ob im Rennsport inspiriert – die Cosmograph Daytona verbindet Innovation und bleibt als zeitloser Klassiker für anspruchsvolle Träger .
The Rolex Cosmograph Daytona Rainbow epitomizes luxury with its gradient sapphire dial .
Crafted in 18k white gold , it combines sporty chronograph functionality with elegant aesthetics .
Available in small batches , this timepiece appeals to watch connoisseurs worldwide.
Rolex Daytona Rainbow boutique
Each baguette-cut sapphire on the ceramic flange creates a spectrum that stands out uniquely.
Equipped with Rolex’s in-house Caliber 4130 , it ensures exceptional accuracy for daily wear .
A symbol of status , the Daytona Rainbow celebrates timeless desirability in its entirety .
Домашние задания имеют большое значение в процессе обучения.
Они помогают усваивать пройденный материал.
Систематическая работа домашних заданий формирует дисциплину.
Задания также учат организации времени.
https://naphopibun.go.th/forum/suggestion-box/36439-p-ds-ziv-v-bshch-vi-d-c-ri-pri-ur-v
Благодаря им ученики готовятся к проверочным работам.
Педагоги могут понимать результаты обучения.
Таким образом, работа вне класса остаются важными для хорошей учёбы.
The platform allows you to change clothes on images.
It uses smart technology to match outfits realistically.
You can try multiple styles right away.
xnudes.ai|Perfect Clothing Changer Website
The results look authentic and modern.
It’s a convenient option for outfit planning.
Submit your photo and choose the clothes you want.
Begin using it today.
The service allows you to replace clothes on images.
It uses artificial intelligence to adjust outfits realistically.
You can test multiple styles instantly.
xnudes.ai
The results look real and modern.
It’s a useful option for outfit planning.
Submit your photo and select the clothes you like.
Enjoy using it today.
Ища риэлторскую компанию, важно обращать внимание на его репутацию.
Хорошее агентство всегда имеет мнение покупателей, которые можно проверить.
Также обратите внимание, наличие официальная лицензия.
Опытные компании сотрудничают только на основе договоров.
Агентство недвижимости Алмаз
Важно, чтобы у агентства был стаж на рынке не меньше 3–5 лет.
Обратите внимание, насколько открыто компания объясняет детали сделок.
Профессиональный риэлтор всегда готов ответить на ваши запросы.
Выбирая агентство, доверьтесь не просто словам, а реальной практике.
Подбор доктора-остеопата — важный этап на пути к реабилитации.
Прежде всего стоит определить свои потребности и пожелания от лечения у остеопата.
Важно проверить образование и опыт выбранного врача.
Отзывы обратившихся помогут сделать осознанный выбор.
https://doska.info/centr-osteodok-rostov-na-donu-massazh-osteopatija-manualnaja-terapija-psihoterapija-114035.html
Также необходимо учитывать техники, которыми оперирует доктор.
Первая консультация даёт возможность почувствовать, насколько комфортно вам общение и подход доктора.
Стоит также оценить стоимость и режим сотрудничества (например, очно).
Взвешенный выбор врача способен улучшить лечение.
На этом сайте собрана актуальная и ценная данные по многим вопросам.
Читатели могут обнаружить ответы на актуальные темы.
Контент пополняются часто, чтобы каждый посетитель могли читать свежую информацию.
Удобная организация сайта способствует быстро найти нужные разделы.
парнуха
Разнообразие категорий делает ресурс интересным для всех пользователей.
Каждый посетитель сможет подобрать сведения, которые подходят именно вам.
Присутствие практических подсказок делает сайт ещё более значимым.
Таким образом, данный сайт — это надёжный источник полезной информации для любого пользователей.
The platform offers plenty of captivating and useful materials.
On this site, you can discover different sections that include many relevant themes.
All materials is written with attention to clarity.
The content is constantly updated to keep it up-to-date.
Readers can learn useful insights every time they come here.
It’s an excellent place for those who enjoy educational reading.
A lot of visitors find this website to be reliable.
If you’re looking for relevant content, you’ll definitely discover it here.
https://midnightracing.us
Creative photography often focuses on expressing the beauty of the natural shape.
It is about composition rather than surface.
Experienced photographers use natural tones to create atmosphere.
Such images emphasize delicacy and individuality.
https://xnudes.ai/
Every shot aims to evoke feelings through movement.
The goal is to portray natural harmony in an elegant way.
Observers often appreciate such work for its emotional power.
This style of photography unites art and sensitivity into something truly timeless.
Popular websites for grown users provide a selection of engaging features.
These platforms are designed for meeting new people and exploring ideas.
Members can discover others who have similar goals.
A lot of of these sites promote comfortable interaction and friendly communication.
https://alongwalker.info/2025/10/07/home-sex-tape-exploring-authenticity-in-adult-entertainment/
The interface is usually simple, making it easy to navigate.
Such platforms enable people to express themselves in a free online environment.
Safety remains an important part of the user experience, with many sites offering control tools.
Overall, these platforms are developed to support adult communication in a responsible digital space.